# Key Concepts
Understanding these fundamental concepts will help you create effective rules and troubleshoot issues when they arise. This guide explains the building blocks of Dynamic Screen Rules and how they work together.
## What is a Rule?
A **rule** is a single instruction that modifies field behavior based on conditions. Think of it as an if-then statement:
**"If \[conditions are met], then \[perform action] on \[target field]"**
For example:
* "If Priority = High, then show the Root Cause field"
* "If Status = Done, then lock the Fix Versions field"
* "If user is in Developers group, then require the Technical Details field"
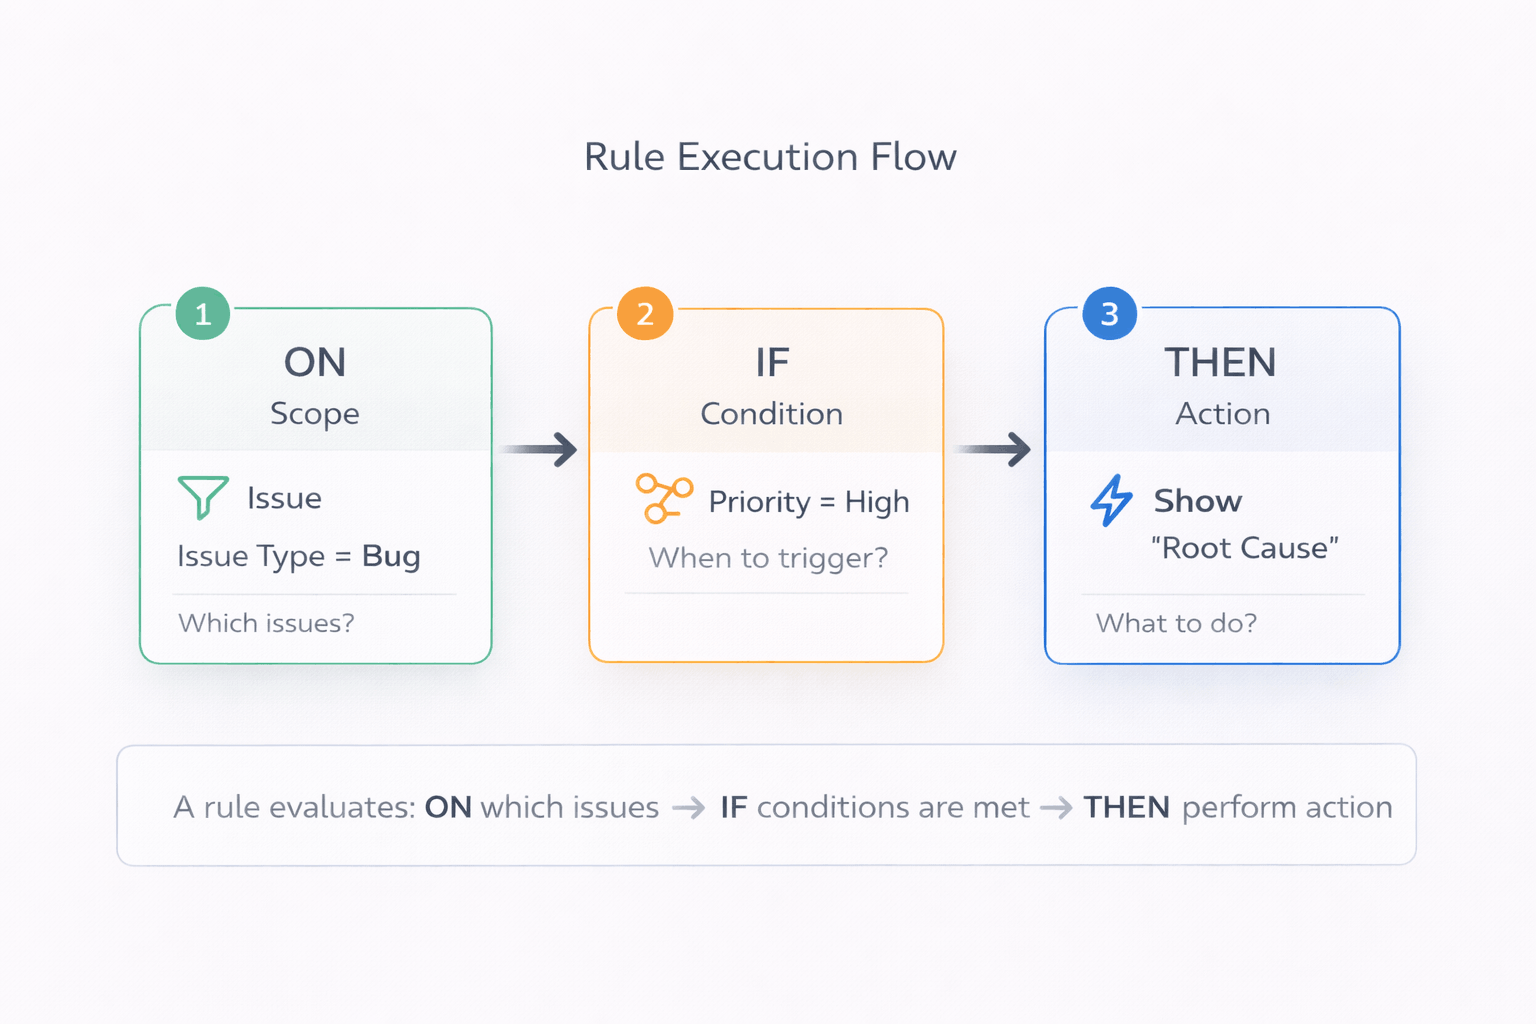
Each rule has four key components:
1. **Target field** - Which field the rule affects
2. **Scope** - Which issues the rule applies to (by issue type)
3. **Conditions** - When the rule should trigger
4. **Action** - What the rule does to the field
Rule execution flow: ON → IF → THEN
{% hint style="info" %}
Rules are evaluated in real-time as users interact with forms. When conditions change (like selecting a different priority), rules re-evaluate instantly and actions update immediately.
{% endhint %}
***
## Screens - Where Rules Apply
**Screens** are the three locations in Jira where users interact with fields. Each screen has slightly different capabilities and use cases.
### Global Issue Create
The create issue dialog where users create new issues.
**When to use:**
* Progressive disclosure - show fields only when relevant
* Pre-fill values based on project or issue type
* Dynamic required fields
* Clean dropdown options
**Capabilities:** All actions supported (show/hide, required, lock, set value, change labels/descriptions, limit options)
### Issue View
The issue detail page where users view and edit existing issues.
**When to use:**
* Lock fields based on status or role
* Role-based field visibility
* Set values when other fields change
* Context-aware field labels
**Capabilities:** Most actions supported (some limitations on required fields due to API constraints)
{% hint style="warning" %}
On Issue View, empty read-only fields are automatically hidden by Jira. If you lock a field that has no value, users won't see it at all.
{% endhint %}
### Issue Transition
Status transition dialogs when moving issues between workflow states.
**When to use:**
* Transition-specific validation (require fields before transition)
* Status-based field visibility
* Pre-fill resolution or close-related fields
* Ensure data completeness at workflow gates
**Capabilities:** Most actions supported
***
## Scope - Which Issues Are Affected
**Scope** determines which issues the rule applies to, filtering by issue type.
### How Scope Works
Every rule has a scope defined by:
* **Project** - Always the project where the rule is configured (automatic)
* **Work type (Issue Type)** - Bug, Story, Task, Epic, or custom types
**Example scopes:**
* "Apply to Bug issues only"
* "Apply to Story and Epic issues"
* "Apply to all issue types in this project"
### Why Scope Matters
Scope is the first filter. If an issue doesn't match the scope (wrong issue type), the rule doesn't evaluate at all - conditions are never checked, and actions never execute.
**Flow:**
1. User creates/views an issue
2. Is it the right issue type? (scope check)
* **No** → Rule doesn't apply, skip it
* **Yes** → Continue to conditions
3. Are conditions met?
* **No** → Action doesn't execute
* **Yes** → Execute action
{% hint style="success" %}
**Scope vs Conditions:** Scope filters by issue type (which kinds of issues). Conditions filter by field values, context, or user (when within those issue types). Use scope for broad filtering, conditions for specific triggers.
{% endhint %}
***
## Conditions - When Rules Trigger
**Conditions** determine when a rule should execute its action. Conditions evaluate field values, context, or user attributes.
### Field-Based Conditions
Trigger based on values in other fields on the form.
**Operators:**
* Equals, not equals
* Contains, doesn't contain
* Is empty, is not empty
* Greater than, less than
* In list, not in list
**Examples:**
* "When Priority = High"
* "When Component contains 'Backend'"
* "When Story Points > 5"
* "When Assignee is empty"
### Context-Based Conditions
Trigger based on issue context (status, project attributes).
**Available filters:**
* **Status** - "When Status = In Progress"
* **Project** - "When Project = Customer Platform" (usually redundant since rules are per-project)
**Examples:**
* "When Status = Done" (lock fields to prevent edits)
* "When Status != Building" (hide deployment-related fields)
### User-Based Conditions
Trigger based on who is viewing/editing the form.
**Available filters:**
* **Group membership** - "When user in Developers group"
* **Project role** - "When user has Administrator role"
* **Permissions** - "When user has Edit Issues permission"
**Examples:**
* "Show sensitive fields only to Managers group"
* "Require approval only for non-Administrators"
* "Lock field for everyone except Release Managers"
### Combining Conditions
You can add multiple conditions to create complex logic:
**Within the same type (OR logic):**
* Priority = High OR Priority = Critical
* Component contains 'Backend' OR Component contains 'API'
**Across different types (AND logic):**
* (Priority = High OR Priority = Critical) AND (User in Managers group)
* Status = Done AND (User has Administrator role)
{% hint style="info" %}
**Multiple conditions of the same type** have OR relationship (any can be true). **Different condition types** have AND relationship (all types must be satisfied). Learn more in [Combining Conditions](https://teranoapps.gitbook.io/dynamic-screen-rules/configuration-guide/defining-rule-conditions).
{% endhint %}
***
## Actions - What Rules Do
**Actions** define what happens to the target field when conditions are met.
### Show / Hide Field
Control field visibility based on conditions.
**When to use:** Progressive disclosure - show fields only when relevant
**Example:** "Show 'Root Cause' field when Priority = High"
### Make Field Required
Enforce validation conditionally.
**When to use:** Require fields only in specific contexts
**Example:** "Require 'Business Justification' when Estimated Cost > $10,000"
**Note:** Not supported on Issue View screen due to API limitations
### Lock Field (Read-Only)
Prevent editing by making fields read-only.
**When to use:** Guard rails to prevent accidental changes
**Example:** "Lock 'Fix Versions' when Status != Building"
### Set Field Value
Automatically populate field values.
**When to use:** Reduce manual data entry, ensure consistency
**Value types:**
* **Static values** - "Set Component = 'Backend'"
* **Smart Values** - "Set Due Date = next business day"
**Example:** "Set Assignee = Team Lead when Priority = Critical"
### Change Field Label
Modify the field name displayed to users.
**When to use:** Context-aware labeling for clarity
**Example:** "Change 'Description' label to 'Steps to Reproduce' when Issue Type = Bug"
### Change Field Description
Update the help text shown below the field.
**When to use:** Provide context-specific guidance
**Example:** "Change 'Priority' description to 'P1/P2 only for bugs' when Issue Type = Bug"
### Limit Field Options
Show only specific options in select/multi-select fields.
**When to use:** Prevent invalid selections, clean dropdowns
**Supported fields:** Single select, multi-select, checkboxes, priority, resolution, versions
**Example:** "Show only 'P1' and 'P2' priorities when Issue Type = Bug"
***
## Smart Values - Computed Field Values
**Smart Values** are expressions that calculate field values automatically. They're used with the "Set Field Value" action.
### Date Math
Calculate dates relative to today or other date fields.
**Functions:**
* `nextBusinessDay()` - Next business day (Monday-Friday)
* `nextMonday()`, `nextFriday()` - Next occurrence of weekday
* `today().plusDays(7)` - Add days to today
* `field('duedate').minusDays(2)` - Subtract days from another field
**Examples:**
* "Set Due Date = next business day"
* "Set Start Date = next Monday"
* "Set Review Date = today + 3 business days"
### Field References
Copy values from other fields.
**Syntax:**
* `field('fieldname')` - Get value from another field
**Examples:**
* "Set Summary = copy from Parent"
* "Set Component = value from Linked Issue"
### Conditional Expressions
Calculate values based on logic.
**Syntax:**
* `if(condition, trueValue, falseValue)`
**Examples:**
* "If Priority = High, set Assignee = Team Lead, else leave empty"
* "If Story Points > 5, set Label = 'Needs Breakdown'"
{% hint style="info" %}
Smart Values use an expression language similar to Jira Automation. Learn more syntax and examples in [Using Smart Values](https://teranoapps.gitbook.io/dynamic-screen-rules/configuration-guide/using-smart-values).
{% endhint %}
***
## Execution Model - How Rules Work at Runtime
Understanding when and how rules execute helps you design effective rules and troubleshoot issues.
### When Rules Evaluate
Rules evaluate at two key moments:
**1. Screen Load**
* User opens create dialog, issue view, or transition dialog
* All rules for that screen evaluate
* Conditions evaluate
* Actions execute if conditions are met
**2. Field Changes**
* User changes a field value (priority, component, etc.)
* Rules that reference that field re-evaluate
* Actions update in real-time
### Real-Time Updates
Rules don't wait for form submission. Changes apply instantly:
* User selects "Priority = High"
* Rules with Priority conditions re-evaluate immediately
* Fields show/hide, become required, update values - all in real-time
* No page refresh needed
{% hint style="success" %}
**This is powerful for user experience.** Users get immediate feedback about what they need to fill. The form adapts to their input as they work, guiding them naturally through the process.
{% endhint %}
Rule execution timeline: from screen load to real-time field changes
***
## Putting It All Together
Let's see how all these concepts work together in a practical example.
### Example Rule: Root Cause for High-Priority Bugs
**Business requirement:** "We need root cause analysis for high-priority bugs, but not for routine bugs or other issue types."
**Rule configuration:**
| Component | Value | Explanation |
| ---------------- | ------------------- | ----------------------------------------------- |
| **Screen** | Global Issue Create | Apply when creating issues |
| **Target Field** | Root Cause | The field we want to show conditionally |
| **Scope** | Bug issue type | Only applies to Bugs (not Stories, Tasks, etc.) |
| **Condition** | Priority = High | Triggers when Priority is High |
| **Action** | Show field | Makes Root Cause visible |
**How it works:**
* User creates Bug → Scope matches (✅)
* Priority = High → Condition met (✅) → Root Cause appears
* Priority changes to Medium → Condition not met (❌) → Root Cause disappears
Forms stay clean while ensuring data quality where it matters.
***
## How Concepts Relate
Every rule is built on three essential pillars:
Three pillars of every Dynamic Screen Rule
**WHERE** defines the screen context - which Jira surface the rule operates on (Issue Create, Issue View, or Transition).
**WHEN** specifies the conditions - the criteria that must be met for the rule to trigger (Priority = High, Status = Open, User in group, etc.).
**WHAT** determines the action - what happens to the target field when conditions are met (Show/Hide, Required, Lock, Set Value, etc.).
Together, these three pillars form a complete rule that makes your Jira screens dynamic and context-aware.
***
## Next Steps
Now that you understand the fundamental concepts:
**Learn to configure rules:**
* [**Creating Your First Rule**](https://teranoapps.gitbook.io/dynamic-screen-rules/configuration-guide/creating-your-first-rule) - Detailed step-by-step configuration guide
* [**Defining Conditions**](https://teranoapps.gitbook.io/dynamic-screen-rules/configuration-guide/defining-rule-conditions) - Master all condition types and logic
* [**Defining Actions**](https://teranoapps.gitbook.io/dynamic-screen-rules/configuration-guide/defining-actions) - Explore all seven action types
* [**Using Smart Values**](https://teranoapps.gitbook.io/dynamic-screen-rules/configuration-guide/using-smart-values) - Learn the expression language
**See practical examples:**
* [**Use Cases & Examples**](https://teranoapps.gitbook.io/dynamic-screen-rules/use-cases-and-examples/progressive-disclosure) - Ready-to-use configurations
* [**Dynamic Required Fields**](https://teranoapps.gitbook.io/dynamic-screen-rules/use-cases-and-examples/dynamic-required-fields) - Conditional validation examples
* [**Field Locking on Transitions**](https://teranoapps.gitbook.io/dynamic-screen-rules/use-cases-and-examples/field-locking-by-status) - Lock fields during transitions
**Understand the details:**
* [**Rule-Based Approach**](https://teranoapps.gitbook.io/dynamic-screen-rules/understanding-rules/rule-based-approach) - Deep dive into how rules work
* [**Screens & Contexts**](https://teranoapps.gitbook.io/dynamic-screen-rules/understanding-rules/screens-and-contexts) - Detailed screen capabilities
* [**Condition Types**](https://teranoapps.gitbook.io/dynamic-screen-rules/understanding-rules/condition-types) - Comprehensive condition reference
Ready to create more complex rules? Start with [Creating Your First Rule](https://teranoapps.gitbook.io/dynamic-screen-rules/configuration-guide/creating-your-first-rule).